Find downstream sites
Summary :: Usage :: Parameters :: Outputs :: Warnings :: Limitations :: Code sample
Summary
Returns a list of downstream sites for each input site. Output is written to a table.
 An example of this tool being used to identifying downstream structures that would affect catadromous species is discussed here.
Usage
Requirement for using this tool:
To use this tool you must have attributed the network with:
This tool creates a new stand alone table recording sites found downstream of each input site. Downstream is defined as the route from the input site to the network mouth for the catchment. The river network needs to be in a projected coordinated system.
Sites that have no sites downstream of themselves are coded with a -1. Therefore all sites are returned in the output as either -1 or a list of downstream IDs. During processing sites are sorted into catchments based upon the catchment ID encoded into the network. Sites are only linked within the same catchment ID, this avoids the tool reporting sites downstream of the input site that may exist in another catchment which are linked by a bifurcation.
The default behaviour of this tool is to return all valid encountered downstream sites along the route to network mouth. You can alter the behaviour of the tool to return only the first, thus nearest, encountered site by checking on the parameter Return the first encountered downstream site.
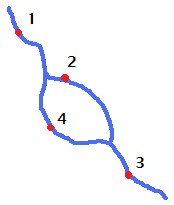
A traverse downstream will pick up sites on either side of any braid\loop, thus in the example below the sequence reported by RivEX for site 1 could be 2, 4 & 3. The sequence is dictated by the sites distance from river mouth. If 2 and 4 happened to be exactly the same distance from the river mouth then the reporting sequence will be dependent upon the order the polylines were digitised.
If you tick on Return the first encountered downstream site then this alters the default behaviour of returning all valid downstream sites to returning only the first, thus nearest, valid downstream site.
If you tick on Constrain downstream search to source ID then you constrain the search to return only downstream sites on the same source ID as the site to search. You can think of this as only searching for sites on the route to next major downstream tributary, ignoring any minor tributaries. This constraint can generate sites that report they have no downstream sites, thus code as -1. This can happen when none of the downstream sites are actually on the source ID. If you use this constraint option RivEX will report in the message box the number of sites that were rejected as not having a downstream site and then list all the ID's. Be aware traversing in a downstream direction means the source ID is constantly changing so this tool will generate a large number of sites reporting they have no down stream sites when constrained by the source ID.
Why constrain by source ID when searching in a downstream direction? This essentially stops you associating your site with downstream sites that have significantly larger catchment areas as source ID can be thought of as proxy to catchment area. Your analysis may require you to compare sites on a similar sized channel. If you simply want to know what are all the downstream sites then make sure this option is unticked.
You can further filter data by the attributes within the downstream site layer to search. You can build a SQL expression to filter your downstream sites. For example you may be only interested in downstream sites that occur on Strahler order 4 or greater. May be your sites represent barriers with varying passibility and you are only interested in barriers that have low passibility to fish, you would set the SQL expression to select these points only. If you set this then only sites that fulfil the selection criteria are considered when RivEX traverses the network. To use this parameter the attributes you want to filter downstream sites by must be encoded into the downstream site layer. You can use the RivEX tool Transfer network metrics to pass values encoded in the network into your site layer. Creating a SQL expression that does not select any sites will cause RivEX to default to processing all sites.
Before RivEX searches the sites, it checks if all sites are intersecting the river network. Only snapped sites are processed, failed sites are reported in the error log tables (tblFailedSitesFrom or tblFailedSitesTo) that can be optionally loaded into the map for convenience.
If a selection exists on the river network this is cleared. Input sites must be snapped to the network and have a unique numeric ID (which is not the Object ID field). You can choose to process a subset of sites if they have been selected and you have ticked on the appropriate parameter. If the sites to search is also the downstream sites to find layer then any existing selection is cleared and all sites are processed, this is because they are the same layer.
Parameters
|
Name |
Help |
Data type |
|
River Network |
The river network. For best results the network should be within a File GeoDatabase |
Feature Layer |
|
Sites to search |
A point layer for which you want to find the the sites downstream of, think of this as the FROM layer. This layer must conform to these specifications:
Note this layer can also be the downstream sites to find layer. |
Feature Layer |
|
Site ID |
This is a numeric (integer) field that uniquely identifying the sites. Text, Object ID or FID fields are not accepted. |
Field |
|
Use only selected sites to search |
Indicates if only selected sites are to be processed:
Note if your downstream sites to find layer is also your sites to search layer then if selections exist and you have checked this box, the selection is cleared and all sites are processed. This is because both inputs are the same layer. |
Boolean |
|
Downstream sites to find |
A point layer that are the downstream sites to search for, think of this as the TO layer. This layer must conform to these specifications:
Note this layer can also be the sites to search FROM layer. |
Feature Layer |
|
Site ID |
This is a numeric (integer) field that uniquely identifying the sites. Text, Object ID or FID fields are not accepted. |
Field |
|
Output table name |
The output Table name. RivEX auto-populates this field using the input site layer name and attaches "_DownstreamSites" to the end of it. You may need to edit it if the site layer name is not file geodatabase compliant. This must be a valid file geodatabase table name, so cannot have spaces, unusual characters or start with a number. You have no control over its location, it will be stored in the output folder in ..\RivEX_Workspace\Outputs\fGDB_Sites.gdb |
String |
|
Return the first encountered downstream site |
Filters the output to return only the first encountered downstream site.
|
Boolean |
|
Constrain downstream search to source ID |
Constrains searching of downstream sites to the same Source ID as the site to search:
|
Boolean |
|
Filter downstream sites by attribute |
Build a SQL expression to filter your downstream sites. For example you may be only interested in downstream sites that occur on Strahler order 4 or greater. If you set this then only sites that fulfil the selection criteria are considered when RivEX traverses the network. To use this parameter the attributes you want to filter downstream sites by must be encoded into the downstream site layer. You can use the RivEX tool Transfer network metrics to pass values encoded in the network into your site layer. Creating a SQL expression that does not select any sites will cause RivEX to default to processing all sites. |
SQL Expression |
|
Add an attribute index to output |
Indicates if RivEX will create an attribute index for the site ID field in the output table.
If you plan to join or relate data then it is STRONGLY recommended you create attribute indices for the outputs; an index can significantly speed up query operations. |
Boolean |
|
Add Error Log Table to Map |
If this is ticked (default) the error log table will be added to the map for your convenience if any errors were found. |
Boolean |
|
Build a Relate for Error Log |
If this tick box is checked then the error log table must be loaded into the map and RivEX builds a standard relate between the Error Log table and the river network layer. You can use the relate to help you jump to and review the error. |
Boolean |
Outputs
The output table can be given a name but you have no control over where it is stored, this would be in the file geodatabase in the output folder ..\RivEX_Workspace\Outputs\fGDB_Sites.gdb.
The output table contains the following fields:
|
Field |
Description |
|
SiteID |
The ID of the site that was searched |
|
Site_Cat |
The catchment ID the site is in |
|
Site_D2M |
Distance from network mouth for site |
|
DSSite_ID |
Downstream Site ID |
|
DSSite_D2M |
Distance from network mouth for the downstream site |
|
DSSite_Dis |
Distance from the site to the downstream site |
Distance values are in the units of the river network. Any sites that have no downstream sites are assigned a -1 value for the fields DSSite_ID , DSSite_D2M, DSSite_Dis. Output in the table is sorted for each SiteID by DSSite_Dis.
If you have selected the optional processing task, add attribute index, then the SiteID field in the output dataset will be indexed. An index can significantly speed up query operations such as joins or relates.
If errors were generated then this tool can create two stand alone tables named tblFailedSitesFrom or tblFailedSitesTo. The table is created in the RivEX workspace folder and stored in the File GeoDatabase found in ..\RivEX_Workspace\ErrorLogs\fGDB_RivEXErrorLogs.gdb
Advice on the structure of the error log table and how it can be used is found within this section of the manual. Take note of the warning if you plan to construct a model using the error log output in subsequent processing.
 Warnings
If a downstream site is at exactly the same location as your input site (stacked points) then these are processed and the distance between the sites will be zero.
The DSSite_Dis field is not calculated using a "classic" shortest path search it is calculated by subtracting the distance from network mouth of the TO site from the distance to network mouth of the FROM site. In river networks without loops this will always yield an accurate measure. In networks where the sites are separated by network that contain loops it is possible for RivEX to over estimate the distance between sites if the downstream site distances to network mouth was calculated by traversing another route through the multi-threaded section. Such over estimates are generally trivial but if the multi-threaded sections of the network are highly sinuous this may generate an unacceptable error. More information can be found here.
This tool checks for stacked points in the input dataset and warns the user if any are found. It returns a count on the number of stacks found to give you a sense of the extent of the issue. RivEX will continue to process such data. If stacked locations are unexpected for your input data then it is recommend you quality control the input layer before continuing with your analysis.
With the release of ArcGIS Pro 3.2.1 a switch control appears on parameters that accept tables\feature classes, do not interact with it! More advice here.
When this tool is used in a script the river network parameter must be a full path to the Feature Class and not a layer object, see advice here.
Limitations
- The site dataset cannot be a in-memory layer.
- Site layer must not have a table join.
- Sites must be a simple point feature class, multi-point data is not allowed.
Code sample
A minimum code example showing how to call this tool in a python script. This can be run in console or your preferred IDE. If you right click on the tool in the RivEX toolbox and select properties you can view parameter order.
import arcpy
# Import RivEX toolbox
arcpy.ImportToolbox(r"C:\RivEX_ArcPro\RivEX.atbx")
try:
# Input river Feature Class
fcRivers = r"C:\Scratch\ORN\data.gdb\ORN"
# Input search sites Feature Class
fcSites = r"C:\Scratch\fGDB_Scratch.gdb\p3"
# Input downstream sites to find Feature Class
fcDSSites = r"C:\Scratch\ORN\RivEX_Workspace\Outputs\fGDB_Sampling.gdb\fcSample_10K_spaced"
# Run RivEX tool, find all downstream sites along route to mouth, do not constrain to source ID for filter inputs, build an attribute index.
# WARNING This tool will fail if river data is a layer with a selection! If you need to pass in selections use tool directly from toolbox
res = arcpy.scrFindDSSites_RivEX(fcRivers, fcSites, "SampleID", False, fcDSSites, "SampleID", "tblDownstreamSites", False, False, "", True, False, False)
# The downstream sites tables, a derived output
tblDSSites = res.getOutput(0)
# The error table for search sites
tblErrorFROM = res.getOutput(1)
# The error table for the downstream sites
tblErrorTO = res.getOutput(2)
# Check if error table exists
if arcpy.Exists(tblErrorFROM) or arcpy.Exists(tblErrorTO):
# Warn users errors were recorded
print("Errors were encountered, check error log tables!")
# Count number of downstream sites for input site ID 735
n = 0
with arcpy.da.SearchCursor(tblDSSites, "DSSite_ID", "SiteID = 735") as cursor:
for row in cursor:
n += 1
print("Number of sites downstream of site 735 = " + str(n))
except arcpy.ExecuteError:
print("FAILED searching!")
