Scripting with RivEX
RivEX can be automated through python scripting. This page provides a few simple examples using tools to demonstrate how you would call the tools and interact with the output. The help pages for each tool has a code section showing a minimal code example. If you are unfamiliar with scripting then it is recommended you explore automating your processing within modelbuilder as this page is directed to advance users.
Many of the tools run directly from the RivEX toolbox in ArcPro will honour selections if the appropriate checkbox is ticked on, otherwise selections are cleared and all features are processed. A few tools, when scripted, require the input to be a Feature Class (typically a full path string such as C:\mydata\points.shp), these tools list this requirement under the limitations section on the tools help page.
 When developing a script, run the tool first from the RivEX Toolbox in ArcPro, then from the History Pane right click and select Copy Python Command and paste this into your text editor; you will have the parameters in the correct order ready for you to adjust.
Scripting with a Feature Class
The following code shows a tool directly accessing a point Feature Class. More advice about why a river network needs to be a Feature Class is given below.
import arcpy
# Import RivEX toolbox
arcpy.ImportToolbox(r"C:\RivEX_ArcPro\RivEX.atbx")
# Allow overwrite
arcpy.env.overwriteOutput = True
try:
# Input river Feature Class
fcRivers = r"C:\Scratch\ORN\data.gdb\FD\ORN"
# Input sites to search Feature Class
fcSites = r"C:\Scratch\ORN\RivEX_Workspace\Outputs\fGDB_Sampling.gdb\fcSample_10K_spaced"
# Run RivEX tool, find source of site, note the following:
# 1] This run will not build a route feature class or index output.
# 2] The river network and site layers are fed into the tool as full paths to their Feature Class.
# 3] Adding the error table to the map is set to False, if it were True that would raise an error.
# 4] The output of the tool run is captured by the result object which was given the name "res".
res = arcpy.scrFindSource_RivEX(fcRivers, fcSites, "SampleID", False, "tblSources", False, False, False, False, False)
# The sources tables, a derived output
tblSources = res.getOutput(0)
# The error table
tblError = res.getOutput(2)
# Check if error table exists
if arcpy.Exists(tblError):
# Warn users errors were recorded
print("Errors were encountered, check error log tables!")
# Count number of sites which have a distance to source less than 2.5Km
n = 0
with arcpy.da.SearchCursor(tblSources, "SiteID", "Site2Src < 2500") as cursor:
for row in cursor:
n += 1
print("Number of sites within 2.5Km of their source = " + str(n))
except arcpy.ExecuteError:
print("FAILED searching!")
Scripting with a layer object that has a selection
This code sample shows the same Find Source tool being run; a layer object with a selection on the sites is fed in. The optional output to create routes to the sources is then fed into the segment routes tool. An alternative coding style exposing parameter keywords is used, this is purely a personal preference.
import arcpy
# Import RivEX toolbox
arcpy.ImportToolbox(r"C:\RivEX_ArcPro\RivEX.atbx")
# Allow overwrite
arcpy.env.overwriteOutput = True
try:
# Input river Feature Class
fcRivers = r"C:\Scratch\ORN\data.gdb\FD\ORN"
# Input search sites Feature Class
fcSites = r"C:\Scratch\ORN\RivEX_Workspace\Outputs\fGDB_Sampling.gdb\fcSample_10K_spaced"
# Create a layer object
arcpy.MakeFeatureLayer_management(fcSites, "mySiteLayer")
# Select the first 100 sites
arcpy.SelectLayerByAttribute_management("mySiteLayer", "NEW_SELECTION", "SampleID <= 100", "NON_INVERT")
# Run RivEX tool, find source of site, note the following:
# 1] A layer object is passed into the tool with 100 points selected.
# 2] Parameter keywords were kept from the Copy Python Command.
# 3] Optional route dataset is created and line direction flipped.
# 4] Refer to tool's help page to understand where and what the route layer will be called.
res = arcpy.RivEX.scrFindSource(River_Network=fcRivers,
Site_Layer="mySiteLayer",
Site_ID_field="SampleID",
Process_only_selected_sites="True",
Output_Table_Name="tblSourceSubset",
Build_route_to_source="True",
Flip_direction_of_route="True",
Add_an_attribute_index_to_output="False",
Add_Error_Log_Table_to_Map="False",
Build_a_Relate_for_Error_Log="False")
# Get the routes feature class from results object and print full path
fcRoutes = res.getOutput(1)
print(fcRoutes.dataSource)
# Segment the routes created by the Find Source tool into 500m segments
arcpy.RivEX.scrSegmentRoutes(River_Network=fcRivers,
Route_Layer=fcRoutes,
Route_ID_field="SiteID",
Process_only_selected_routes="False",
Segment_length_m=500,
Output_Seg_FC_name="seg500m",
Flip_direction_of_route="False",
Drop_incomplete_end_segment="False",
Extract_points_along_each_segment="None",
Spaced_distance_m=None,
Output_point_FC_name="",
Add_an_attribute_index_to_output="False",
Add_Error_Log_Table_to_Map="False",
Build_a_Relate_for_Error_Log=None)
except arcpy.ExecuteError:
print("FAILED searching!")
Layer versus Feature Class
Note in the two examples above rivers are fed in as a Feature Class. All tools run in a script are expecting the rivers to be a Feature Class as tools typically clear any existing selection on the river network. It is the layers such as sites where there is a check box saying you can use/ignore selections that can be layer objects. If you are not processing selections then you could simply feed site data into a tool as Feature Class. You only need to be manipulating layers if you are processing subsets of data identified by a selection.
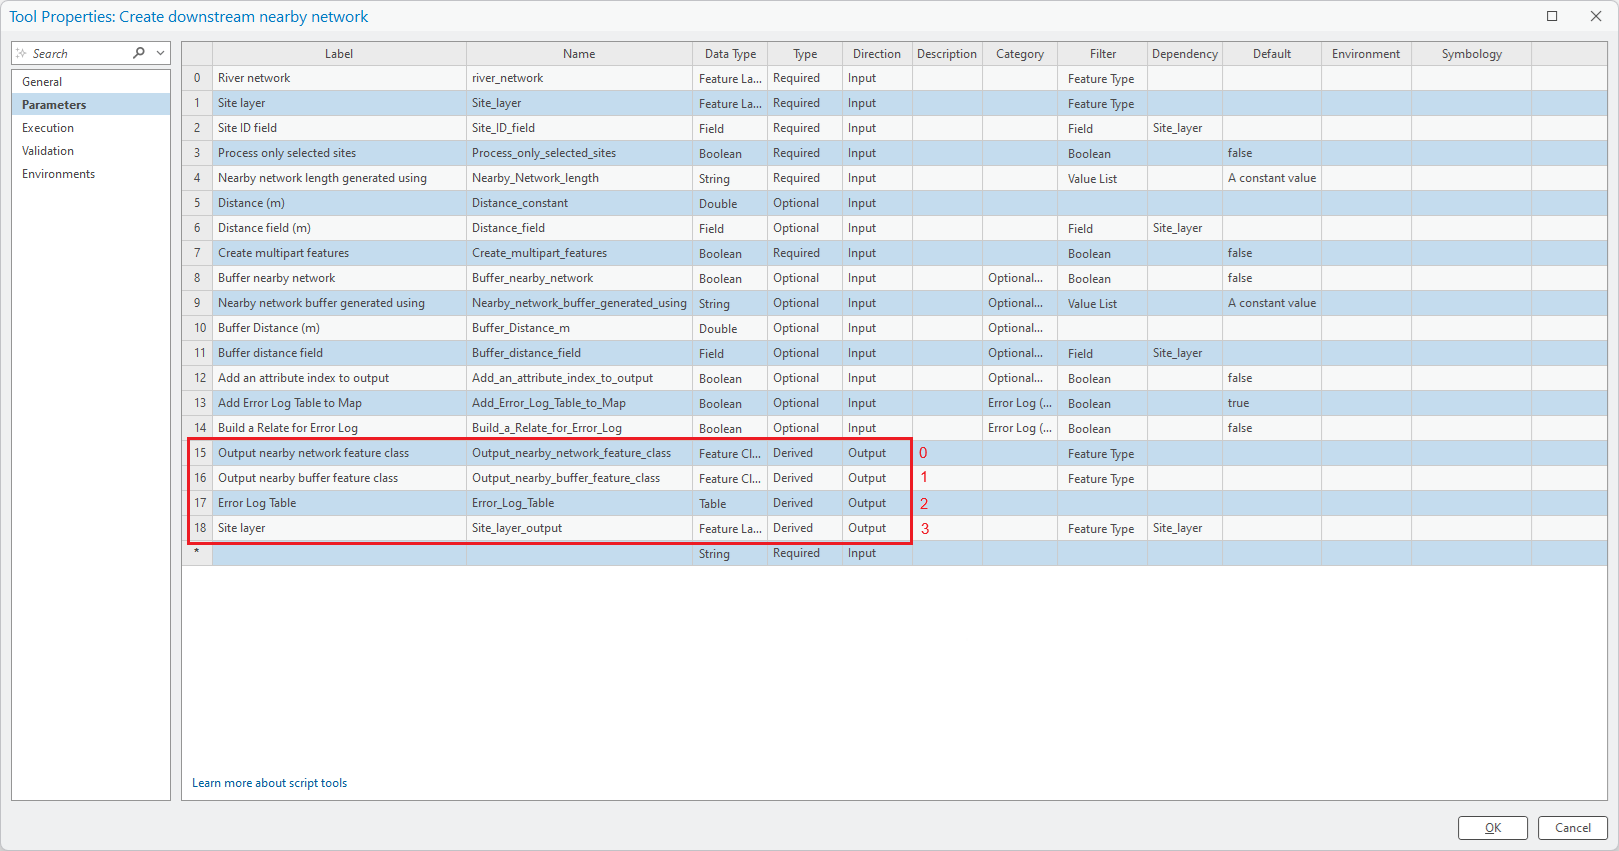
How to determine the order of outputs returned in the results object?
Right click on a tool in the RivEX toolbox and choose Properties. Select Parameters on the left then scan down the parameters, look for the parameters with a direction of Output. The first output is always zero index, then any other outputs are a simple increment. In the image below the 4 output parameters of the Create downstream nearby network tool are highlighted and numbered 0 to 3.